How to Clear Chrome Net Internal DNS Error?
Guided Blogs is your trusted source for easy tips & guides on topics based on tech that help with daily life problems.
If you're encountering a Net Internal DNS error in Chrome, know that it's a common issue often stemming from a corrupted DNS cache, internet connection problems, or misconfigured settings. This article offers a step-by-step guide to troubleshoot and fix the error, including clearing Chrome’s DNS cache, flushing your computer's DNS cache, changing DNS server settings, disabling problematic extensions, restarting your router and device, checking for malware, and resetting Chrome settings. Follow these steps to resolve the issue and get back to browsing seamlessly.
So, you’re surfing the web, presumably just seeking to do something easy like check your email or visit a website, when out of nowhere Chrome throws a Net Internal DNS problem in your face. Annoying, right?
This type of problem isn’t just irritating, it may really stop your whole productivity, particularly if you rely on the browser for business, education or simply your normal digital demands. But don’t worry, you’re certainly not alone in this. The Chrome net internal DNS problem is quite frequent, and happily, it’s typically fixable with few basic actions.
In this post, I’ll walk you through all you need to know about net internal, why this occurs, what causes it, and most importantly, how to cure it. Whether you're tech-savvy or just a normal user trying to figure out what’s going on with www chrome net internals dns, we have you covered.
What is Chrome’s Net Internal DNS Error Anyway?
Before we move into how to remedy this problem, let’s briefly examine what it truly is. The Net Internal DNS issue in Chrome often comes up when the browser is having problems resolving DNS (Domain Name System) entries. That’s simply a techy way of saying Chrome can’t discover the website you’re attempting to contact because it doesn’t know where it exists on the internet.
Imagine DNS as the phonebook of the web. You input a domain name like google dot com, and the DNS lets your browser identify the right IP address for that site. If Chrome’s internal DNS cache is screwed up, obsolete, or damaged, it can’t resolve domains correctly, resulting to the dreaded net internal dns error.
Why Does the Net Internal DNS Error Happen?
There are quite a few plausible explanations for this irritating glitch:
Corrupted DNS cache
Over time, Chrome keeps DNS information in its internal memory. If that cache gets old or misconfigured, it can return inaccurate IP addresses.
Internet connection difficulties
Sometimes it’s just your WiFi being fickle. An unstable connection or transient network shift might trouble with DNS lookups.
VPN or Proxy dispute
Using a VPN or proxy might interfere with how DNS is handled on your device.
Misconfigured DNS settings
If your computer or browser is utilizing a DNS server that’s not operating properly, Chrome might run into difficulties attempting to resolve domains.
Extensions or malware
Browser extensions, especially ones that govern network activities, might interfere with Chrome’s DNS system.
System-level DNS cache issues
It’s not always just Chrome. Your operating system (Windows, macOS, etc.) also stores a DNS cache, and that too might create troubles.
How to Clear Chrome Net Internal DNS Error Step by Step
Here comes the important section. Let’s repair that mistake once and for all. Below are the most effective approaches to address the Chrome net internal DNS problem. Try them one at a time.
1. Clear Chrome’s Internal DNS Cache
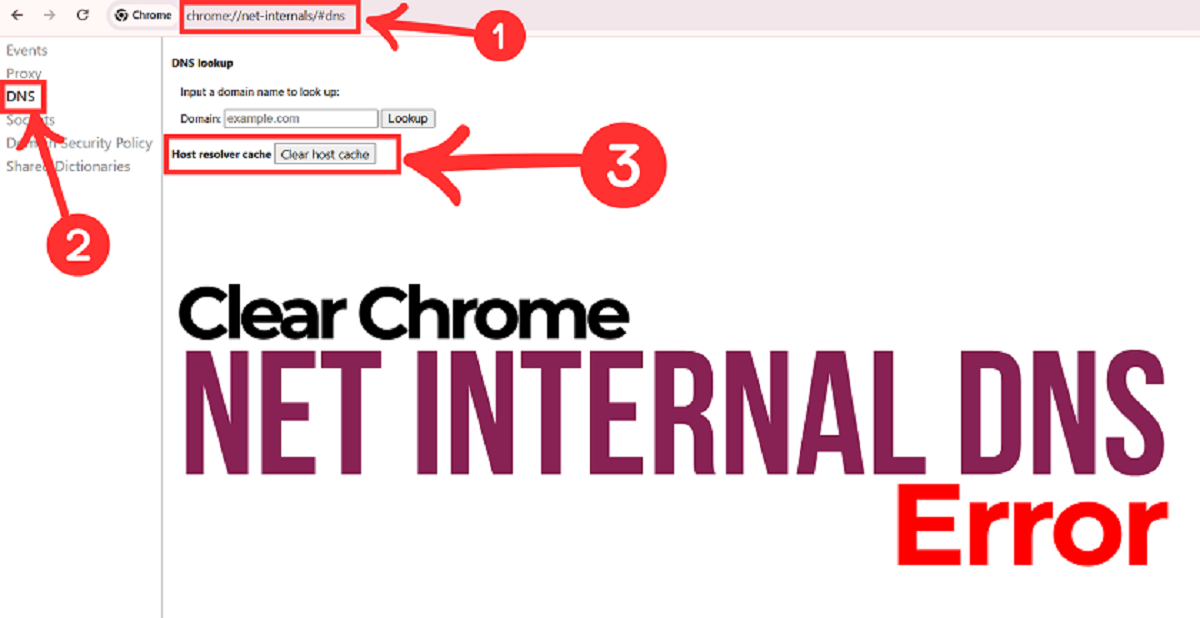
Yep, Chrome has its own internal DNS cache independent from the system cache. Here’s how to clear it:
Open a new Chrome tab.
Type this in the URL bar:
chrome://net-internals/#dnsHit Enter. This will open the www chrome net internals dns page.
You’ll notice a button that reads Clear host cache.
Click it.
This clears Chrome’s internal DNS records and may cure the issue if the cache was damaged.
2. Flush Your machine’s DNS Cache
This step helps when the problem isn’t simply with Chrome but with the machine itself.
For Windows:
Click Start, enter cmd, right-click on Command Prompt, and choose Run as administrator.
In the dark window that opens, type:
ipconfig /flushdnsHit Enter.
You should see a notice reading "Successfully flushed the DNS Resolver Cache." That’s it!
For macOS:
Open the Terminal program.
Type this command:
sudo dscacheutil -flushcache; sudo killall -HUP mDNSResponderPress Enter. You may be prompted for your password.
3. Change Your DNS Server Settings
Sometimes the DNS server supplied by your ISP (internet provider) is simply not dependable. You may change it to something quicker like Google DNS or Cloudflare.
For Windows:
Go to Control Panel > Network and Internet > Network and Sharing Center.
Click on your current connection.
Click Properties.
Select Internet Protocol Version 4 (TCP/IPv4) then click Properties.
Choose Use the following DNS server addresses.
Enter:
Preferred: 8.8.8.8
Alternate: 8.8.4.4
Click OK to save changes.
For Mac:
Go to System Preferences > Network.
Select your current connection and click Advanced.
Go to the DNS tab.
Click the Add button and input 8.8.8.8 and 8.8.4.4.
Click OK, then Apply.
Boom. DNS changed.
4. Disable Problematic Extensions
Some Chrome addons, notably VPNs, ad blockers or traffic filters, could conflict with DNS.
In Chrome, go to the menu (three dots top right) > More Tools > Extensions.
Disable extensions one by one and see whether the problem still exists.
If deactivating one cures the issue, you’ve uncovered the culprit.
Uninstall it or hunt for an updated version.
5. Restart Your Router and Device
This one’s simple yet quite effective.
Turn off your router.
Wait around 30 seconds.
Turn it back on.
Restart your computer also, just for good measure.
This clears transitory network problems and forces a new connection to the DNS servers.
6. Check for Malware
Malware may tamper with DNS settings in devious ways. It’s always smart to conduct a scan.
Use reliable antivirus software or a program like Malwarebytes to examine your machine and eliminate any threats.
7. Reset Chrome Settings
If none of the aforementioned work, maybe Chrome itself is the issue. Try resetting it.
Open Chrome and go to: Settings
Scroll down and click Reset settings
Choose Restore settings to their original defaults
This won’t destroy bookmarks but will remove settings and extensions. A clean start frequently helps.
What if the Net Internal DNS Error Still Shows Up?
Well, if you did everything and you're still getting the issue, here are a few additional ideas:
Try a different browser to determine if the issue is only with Chrome.
Create a new user profile in Chrome. Sometimes user profiles become corrupted.
Check your firewall or security software to check if it’s preventing DNS traffic.
Contact your ISP in case there are DNS difficulties on their end.
Final Thoughts
Dealing with the Chrome net internal DNS issue may be irritating, particularly when you're in the midst of doing something essential. But the good news is, it's typically nothing too significant and you can solve it quite quickly by cleaning caches, updating DNS settings, or performing a few resets.


